Configuring the SmartStatus Steps
In SmartStatus settings, you can modify how SmartStatus operates to better suit your shop's workflow.
The SmartStatus window displays multiple columns. Each column is a SmartStatus step.

Each column is a step that can have an action configured for it. For example, moving a repair order ticket from Dropped Off to Opt in to Texting can have SmartStatus send a text message to the customer automatically.
To Set the Number of Steps on the SmartStatus Window
Steps are the columns you see on the SmartStatus window. You can configure two steps to ten steps.
To open the SmartStatus configuration, click the Configuration tab > SmartStatus in the General Settings column.
In SmartStatus Configuration, scroll down and select the number of columns/steps in the Number of SmartStatus Steps dropdown list.

You configure each step in its own section on this window. For example, if 7 is selected, seven step sections appear on this window.
To Add a Step
When you increase the Number of SmartStatus Steps, a new step section is added to the bottom of this window. Scroll down to see the new step section and configure it.
The new step is added as the last column on the SmartStatus window.
To Remove a Step
You can remove steps by decreasing the number of SmartStatus steps. The last step section on this window is removed. The last column is removed from the SmartStatus window.
To Configure a Step
A step section appears for the Number of SmartStatus Steps selected. Enter the settings for each step individually.
Settings for Each Step
|
Setting |
Description |
|---|---|
|
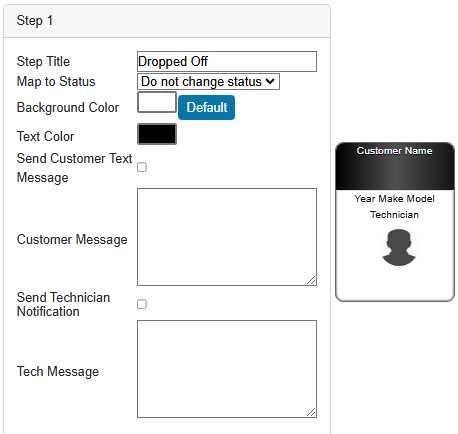
Step Title |
Enter the name of the step. This is the name of the column on the SmartStatus window. |
|
Map to Status |
This dropdown list contains all statuses created in R.O. Writer.
|
|
Background Color |
Click to set the background color of the step's tile. |
|
Default Button |
Click to set the background color back to the default color. |
|
Text Color |
Click to set the color of the text on the step's tile. |
|
Send Customer Text Message |
Check to text the customer automatically when their ticket is moved to this step. A text message symbol |
|
Customer Message |
If Send Customer Text Message is checked, enter a message in this text box. This is the message sent to the customer when the ticket is moved to this step. |
|
Send Technician Notification |
Check to send a message to the technician when their assigned ticket is moved to this step. A text symbol with a “T” |
|
Tech Message |
If Send Technician Notification is checked, enter a message in this text box. This is the message sent to the technician when the ticket is moved to this step. |
 appears in the column header to indicate that this step is configured to send the customer a text.
  appears when there are unread text messages from customers in this step.