Upgrade to DVI Suite 6.0 (Beta Users)
This topic describes the process of upgrading DVI Suite 2.5 to DVI Suite 6.0.
DVI Suite 6.0 is cloud-based and accessed via a browser. No local software installation is required. This new DVI version provides the flexibility to use DVI Command, DVI for Android, and DVI for iOS from anywhere with internet access.
If you are a DVI 2.5 user, your existing DVI Command settings will automatically be configured in DVI Suite 6.0 when you upgrade. Your DVI users will be automatically added to Central Service as a single sign-on (SSO) user. As a result, you will have one login that works with both Central Service and DVI Suite 6.0.
NOTE: When you upgrade to DVI Suite 6.0, your locally installed DVI Command and app connections are disabled; there is no reversing this process.
New Users
If you are a new user, you will first need a Central Service login. When you log into DVI Suite 6.0 for the first time:
- You will be added as a DVI User with admin permissions.
- The default DVI Command settings will be imported.
- Checklists, DVI labor operations, and QuickJobs will be imported.
At this point, you can download the DVI apps from the Android or iOS app stores. The apps will work with either DVI 2.5 or DVI Suite 6.0.
Prerequisites to Upgrade to DVI Suite 6.0
For DVI Command to work, make sure you have the following prerequisites in place:
- R.O. Writer 3.1.16 or higher must be installed on the local computer.
- Chrome or Chromium Edge must be installed on the local computer.
- DVI 2.5 or higher must be installed on the local computer.
- Apple® iOS version 13.0 or higher (iPhone® or iPad®) and/or Android™ 6.0 or higher (smartphone or tablet) with a minimum 5-megapixel (MP) camera for VIN scanning.
- You must have access to the Android Play Store or Apple App Store (to download the DVI Suite 6.0 app).
- Your store must have an owner license number and there must be an owner login to Central Service.
NOTE: These prerequisites apply to existing or beta users upgrading to DVI Suite 6.0.
Upgrade Process
During the upgrade process, the following will occur:
- Your current DVI configuration settings will be sent to DVI Suite 6.0.
- Your DVI users will be added to the list of R.O. Writer Central Service Users.
- Your locally installed DVI software will be permanently disabled.
NOTE: The upgrade process will only take a few minutes but cannot be reversed, and your locally installed DVI software will no longer be available.
After you upgrade, you'll have to complete some administrative tasks to enable DVI Suite 6.0 to work for your shop. You no longer need to maintain a local DVI web server. Then, your data will be available securely in the cloud through DVI Suite and Central Service (which is R.O. Writer's comprehensive enterprise reporting system).
Upgrading From DVI Suite 2.5
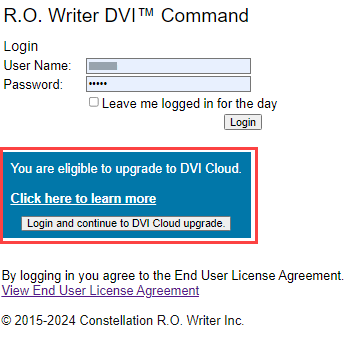
When your license number has been approved to upgrade to DVI Suite 6.0, the upgrade section appears on the standard login window for DVI Command.
To Upgrade From DVI 2.5
NOTE: When you upgrade from DVI 2.5 to DVI Suite 6.0, your locally installed DVI Command and app connections are disabled; there is no reversing this process.
Complete these steps:
- When the DVI Suite 6.0 upgrade section appears on the login window, enter a Username and Password that has DVI admin permissions.
-
Click the Login and continue to DVI Cloud upgrade button.
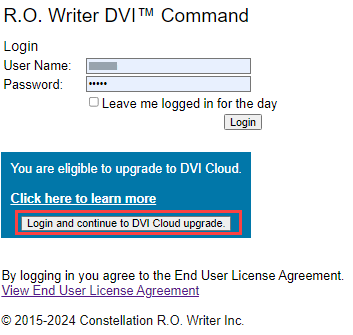
NOTE: If you click the Login button instead, you can still click the Configuration tab > Upgrade to Cloud to continue the process.
The Upgrade to Cloud window in Configuration appears.

- Read the instructions. You must make note of the license number displayed at the bottom of the window.
-
Check the I have read and understand the above information checkbox. This enables the Upgrade to DVI Cloud button.

-
Click the Upgrade to DVI Cloud button, and a final warning message appears to notify you that the upgrade can’t be reversed.
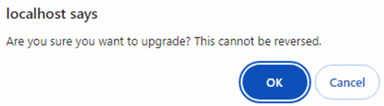
- Click OK. The upgrade process starts, which should take less than one minute.
The upgrade process: - Moves all your settings to DVI Suite 6.0.
- Transmits your existing DVI users to Central Service. Those users are added as a Central Service user account and their existing passwords are retained.
- Changes the existing user account for Central Service.
- Central Service requires that all user accounts be unique. So, the existing user account will be changed to the following format: “[License Number]![OriginalUsername]”.
- For example, the username “rowriter” would be changed to “123456!rowriter”. Then, you could log into DVI with either the “rowriter” or “123456!rowriter” usernames. However, when you log into Central Service, you must use the “123456!rowriter” username.
- Transmits the technician, service writer, and email images to DVI Suite 6.0 storage.
- Disables the locally installed DVI Command 2.5.
-
When the upgrade is complete, the following window appears:
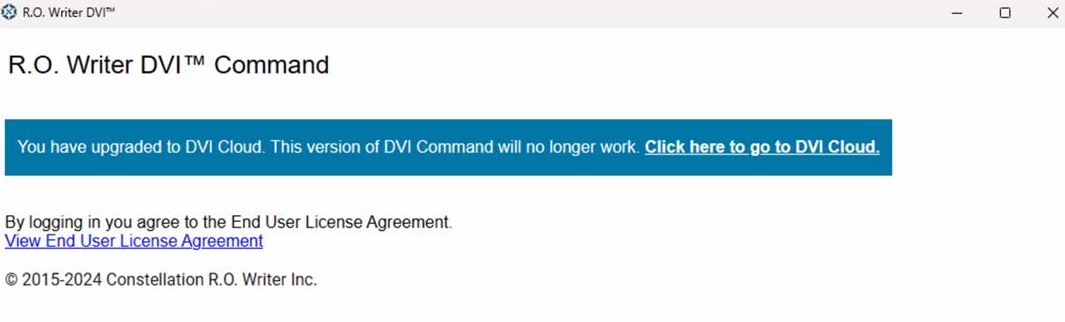
This window opens every time you launch DVI Command 2.5.
NOTE: If you have a custom button on the R.O. Writer toolbar, this window will open each time you click on that shortcut.
Post Upgrade Process
After you log into the upgraded DVI Command, you will see that the cloud version of DVI Command has an enhanced look and feel while maintaining all previous functionality.
Check the DVI Command Configuration
At this point, you should check your DVI Command configuration to ensure that your previous settings were properly imported.
Be sure to check:
- Email settings by sending a test email.
- Technician and service writer images.
- DVI Suite 6.0 now only supports .jpg files. If you used different file types previously (such as .png or .bmp), you will need to manually attach the email logo, service writer, and/or technician images in .jpg format.
- That pop-ups are enabled in the browser:
- Open Google Chrome.
- At the top right, click
 > Settings.
 - Click Privacy and security > Site Settings.
- Click Pop-ups and redirects.
- Click Add next to Allowed to send pop-ups and use redirects.
-
Enter the site's web address, then click Add.
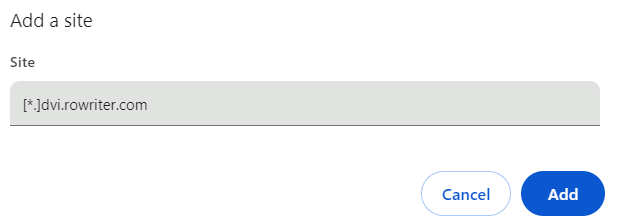
NOTE: To capture all pop-ups across the site, use the following pattern: [*.]example.com.
Access DVI Command Directly
Complete these steps:
- Open your browser and go to https://dvi.rowriter.com.
- Enter your License Number, Username, and Password to log in.
- These are the same usernames and passwords that you previously used to log into DVI Suite 2.5.
Access DVI Command in R.O. Writer
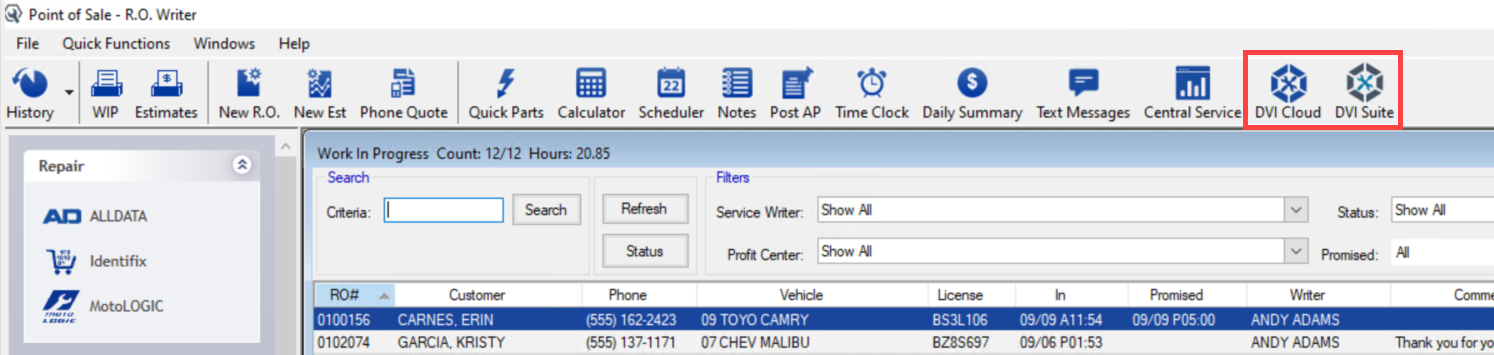
For users who are licensed for DVI Suite 6.0, a DVI Cloud button was added to the main toolbar in R.O. Writer.
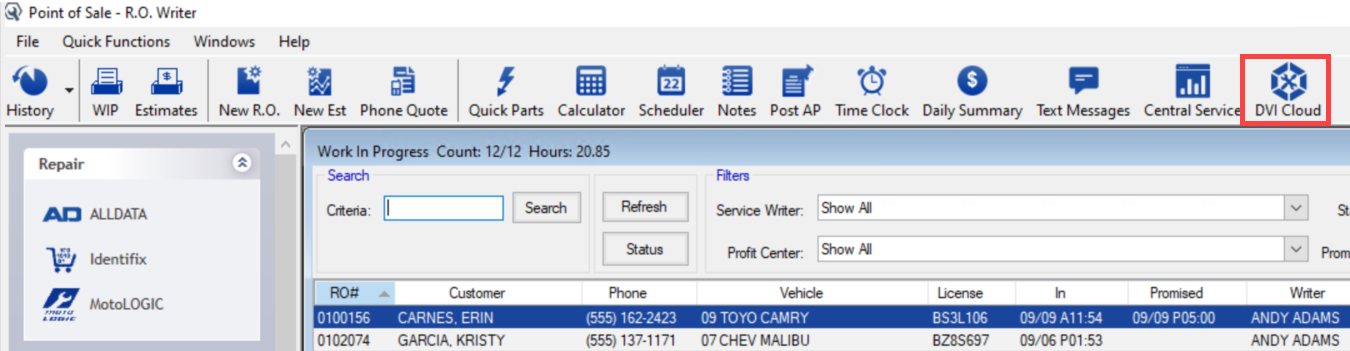
Click the new DVI Cloud toolbar button to access DVI Command directly from R.O. Writer.
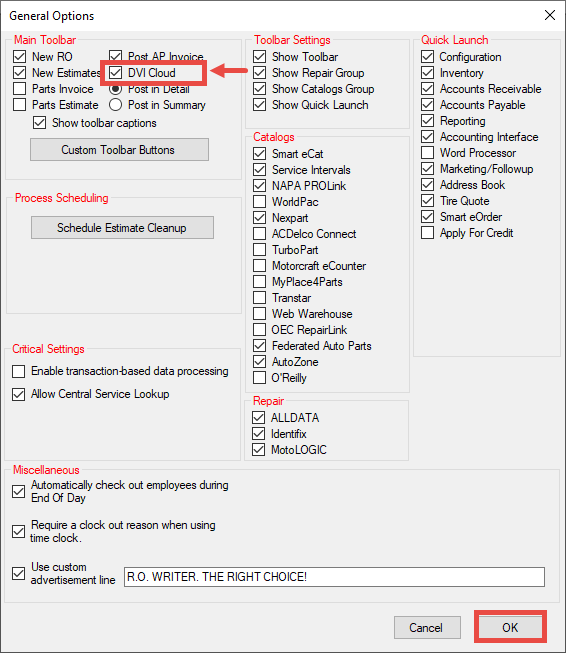
A DVI Cloud setting was added to the R.O. Writer General Options window that determines if the new toolbar button appears in the main toolbar. For licensed users, the DVI Cloud setting is checked by default.
Remove the R.O. Writer Custom Toolbar Button for DVI Suite
If you already had a custom toolbar button for DVI Suite in the main R.O. Writer toolbar before upgrading to DVI Suite 6.0, that custom toolbar button will no longer work. In addition, you will now have two DVI toolbar buttons.
You should remove the old custom DVI Suite button from the toolbar.
Complete these steps:
- Open R.O. Writer Configuration.
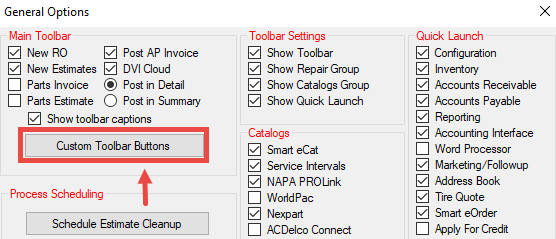
- Click File menu > General Options.
-
On the General Options window, click the Custom Toolbar Buttons button.
- On the Custom Toolbar Setup window, in the Custom Toolbar Button dropdown list, select 1, 2, or 3.
When the number that is programmed with the custom toolbar button for DVI is selected, the details of the DVI Suite button appear and the Edit button activates.
-
Click the Edit button. The fields become active, and the window displays the details for the customer toolbar button for DVI.
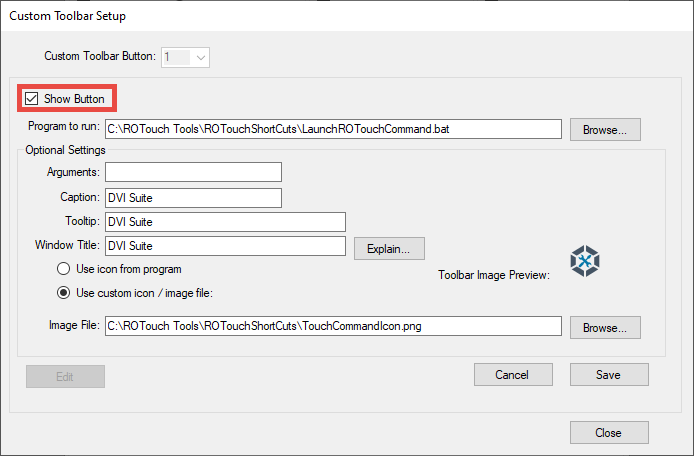
- Uncheck the Show Button setting to hide the button in the main toolbar.
- Click Save to save your settings.
- Click Close to return to the General Options window.
- Click OK and restart R.O. Writer for the changes to take effect.
Update DVI Android and iOS Apps to Version 6.0
DVI Suite 6.0 works with the DVI 6.0 Android or iOS apps. You must ensure that you are on the right version of the DVI app.
Complete these steps:
- Launch the DVI app on your device.
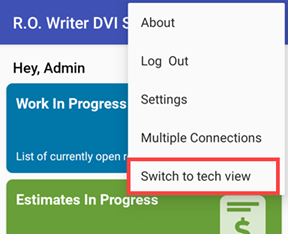
- Tap the
 (three dots) icon and then About. The app version displays on the popup window.
 - If you are on an older version of the app, you'll need to download the most recent version, and then update your data location (explained below).
Update the Data Location in DVI App Version 6.0
To use DVI Suite 6.0 with the apps, you need to update your data location.
Complete these steps:
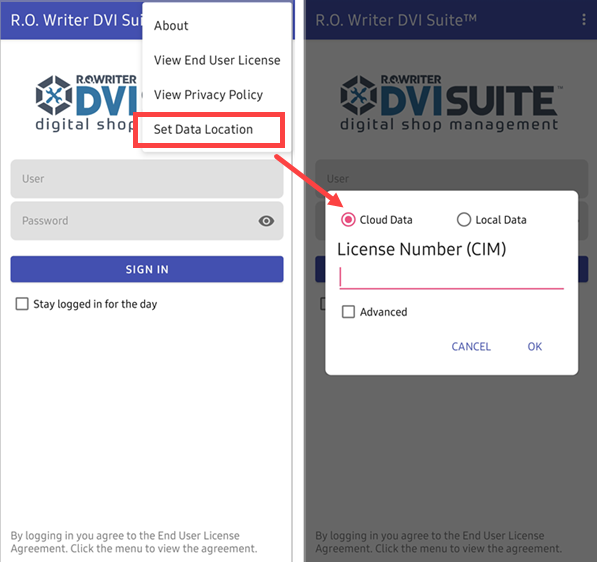
- Tap the (three dots) icon on the DVI Android app (or the menu icon on the DVI iOS app) and select Set Data Location.
- Select Cloud Data.
-
Enter your shop’s License Number and tap OK.
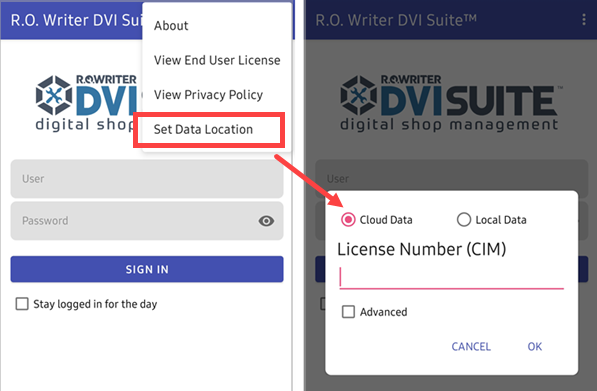
NOTE: Leave the Advanced option unchecked.
- You can now log into your DVI app using your previous username and password.
NOTE: The Android and iOS versions work the same way but differ slightly in appearance. All information in this help website applies to both versions of the app. However, the images in this help system are from the Android version.
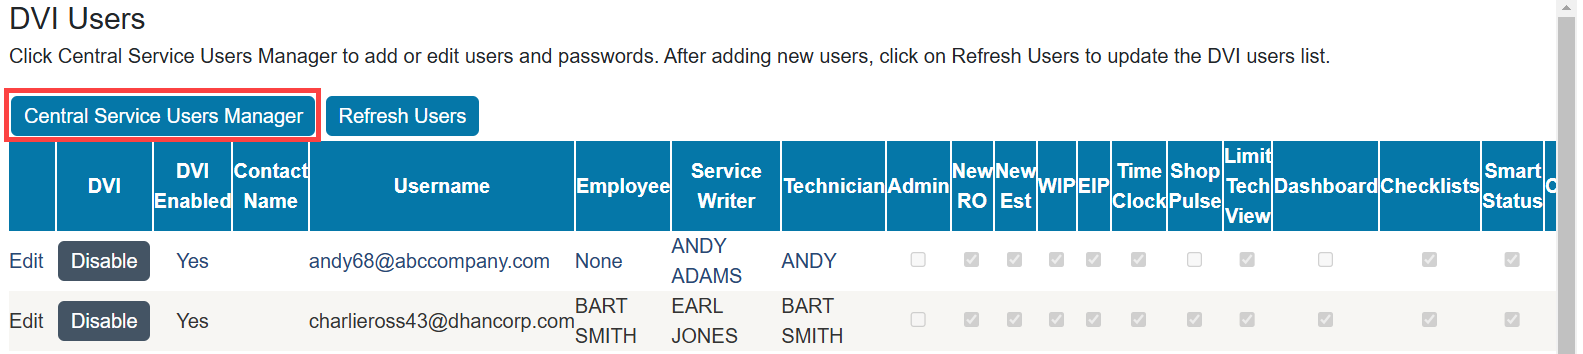
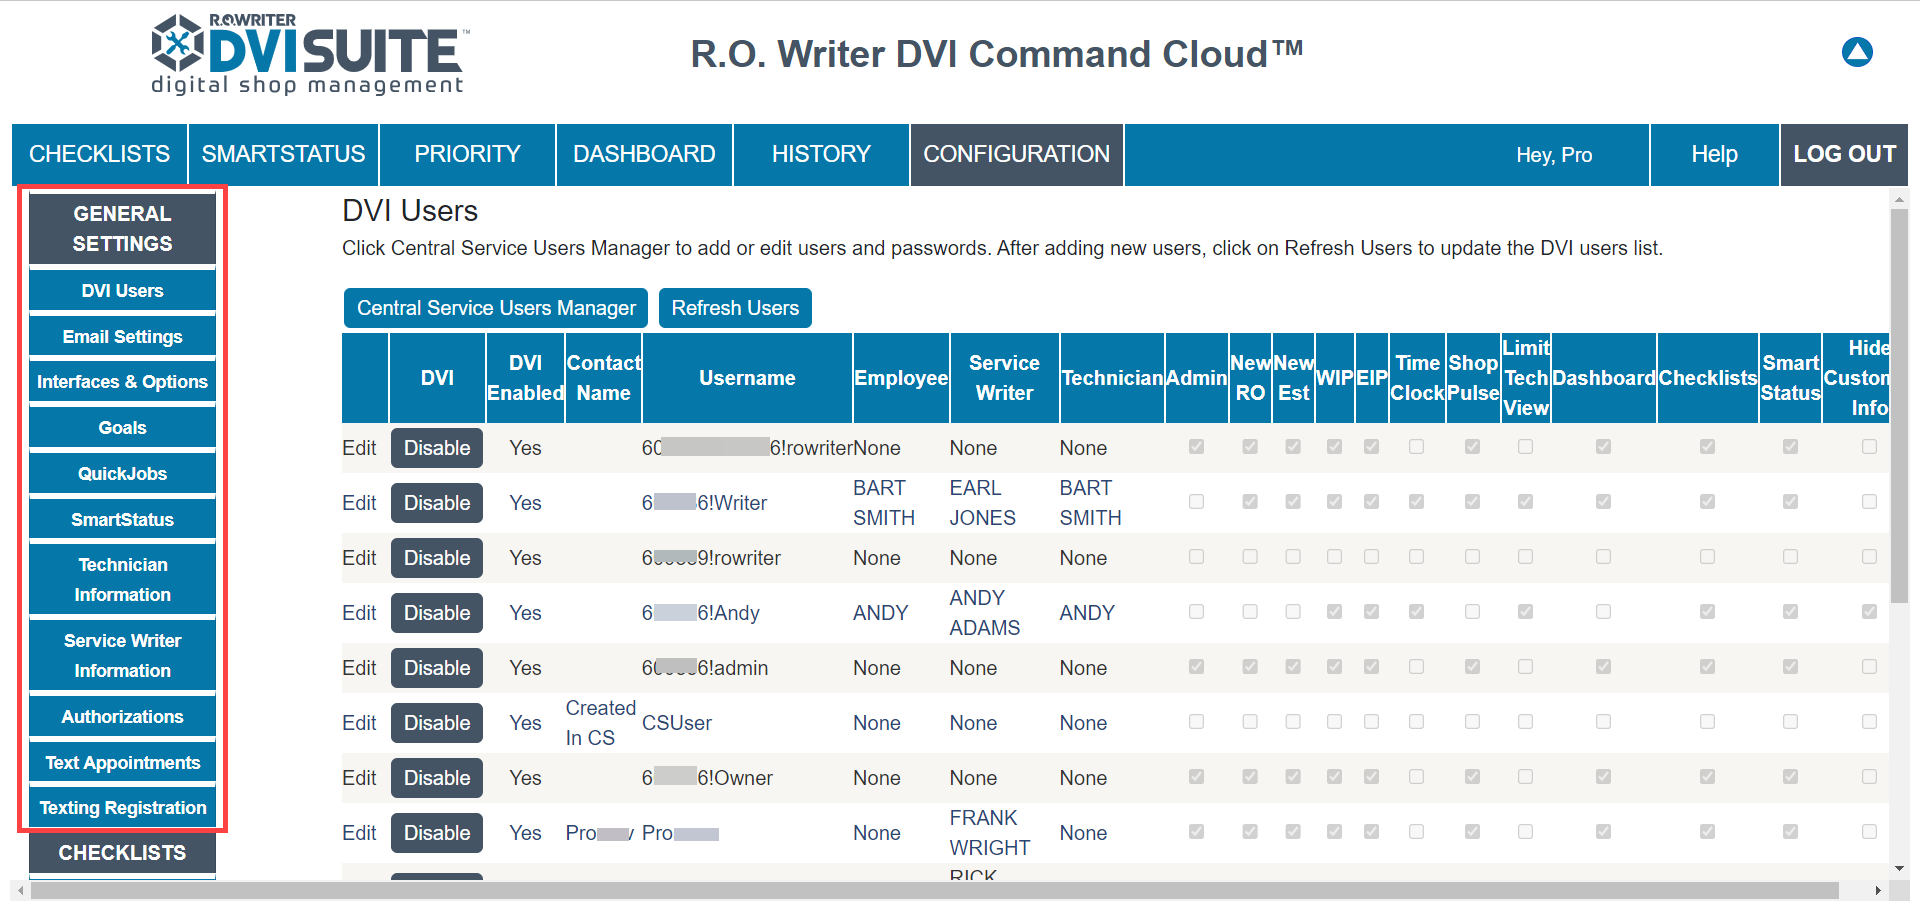
Manage DVI Suite 6.0 Users in Central Service Users Manager
DVI Suite 6.0 and Central Service share a centralized user management system. Each user has a single username and password that allows access to all R.O. Writer Cloud systems.
After the upgrade, you need to add your new DVI users in Central Service.
Complete these steps:
-
Open Configuration > General Settings in DVI Command, click Central Service Users Manager.
-
Add the user in Central Service. Enter the new user’s email address as the username in Central Service.
NOTE: Central Service users must be unique. A warning message will display if the email address has been previously used.
- Go back to General Settings > DVI Users in DVI Command configuration, click Refresh Users, and the new users appear in the list.
-
Click the Enable button to activate the Central Service user as a DVI user.
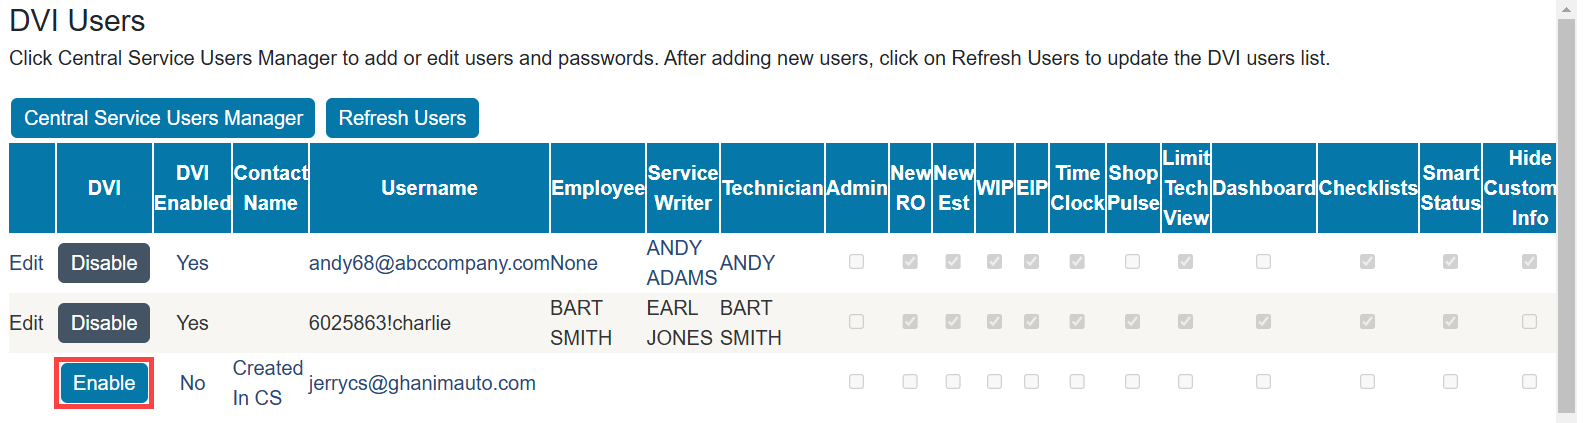
NOTE: The Enable/Disable button controls the user’s access only to DVI. This button does not control user access to Central Service.
-
Click the Edit link and configure the DVI user settings.
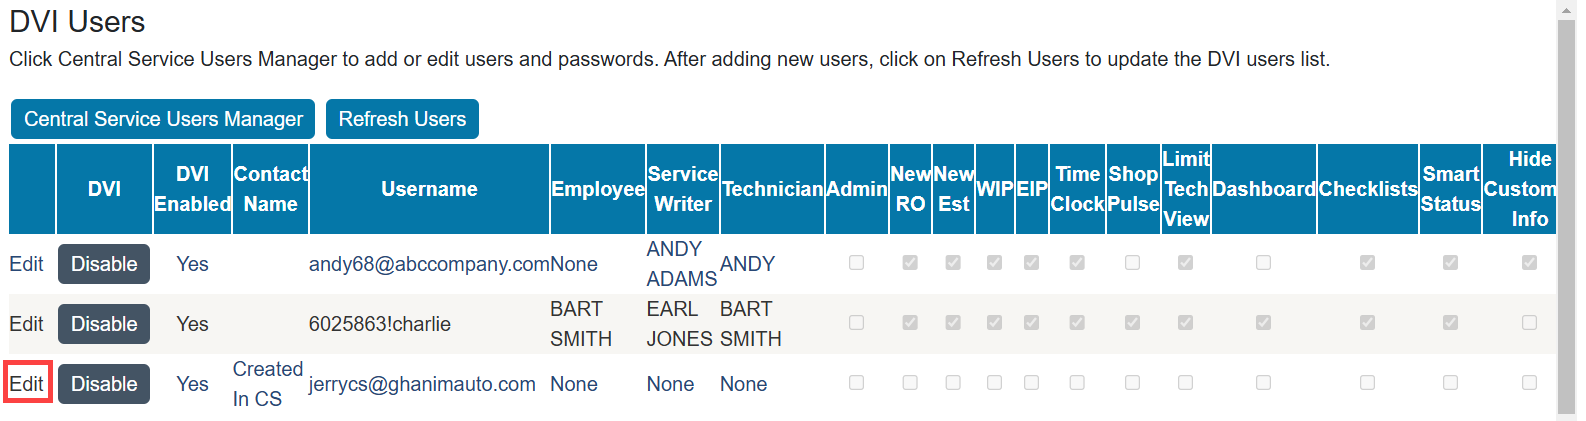
-
Click the Update link to save the DVI user settings.

NOTE: After the users have been added to Central Service, you can then configure DVI user access in DVI Command the same way the users are managed in DVI Suite 2.5.
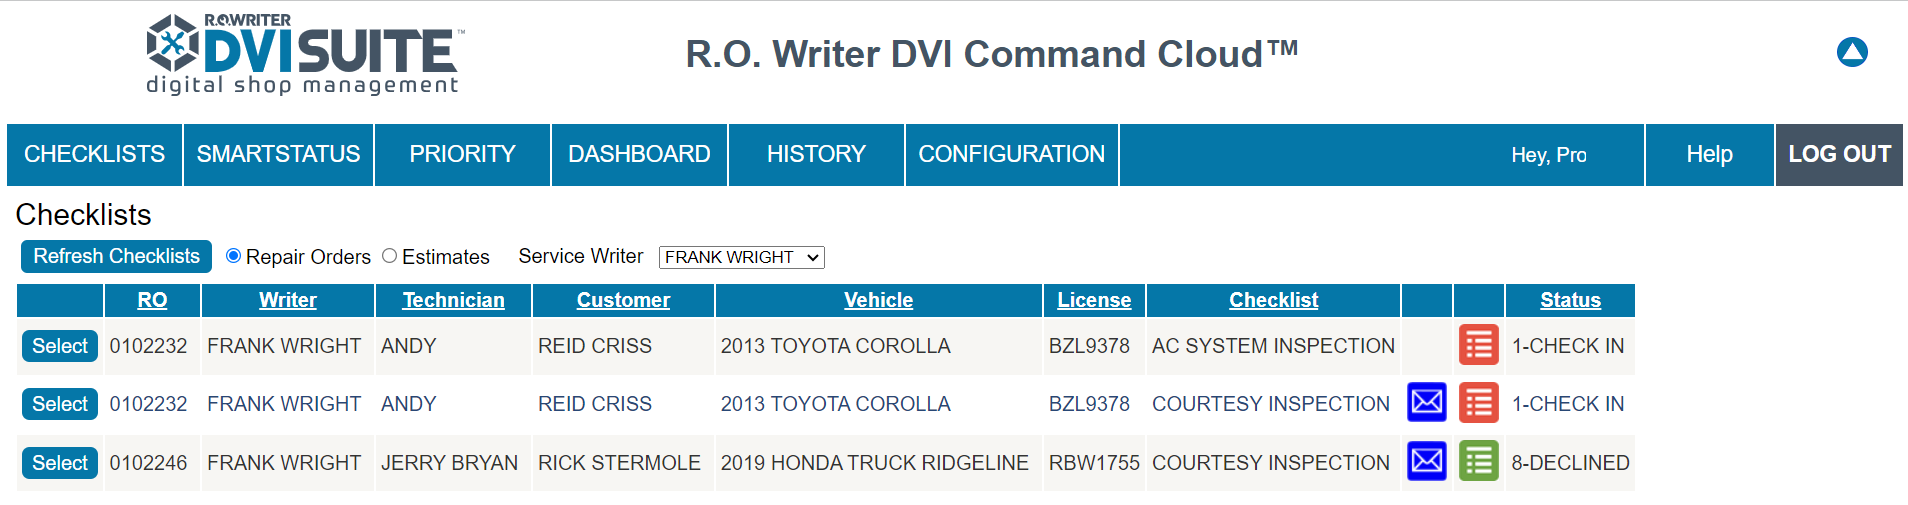
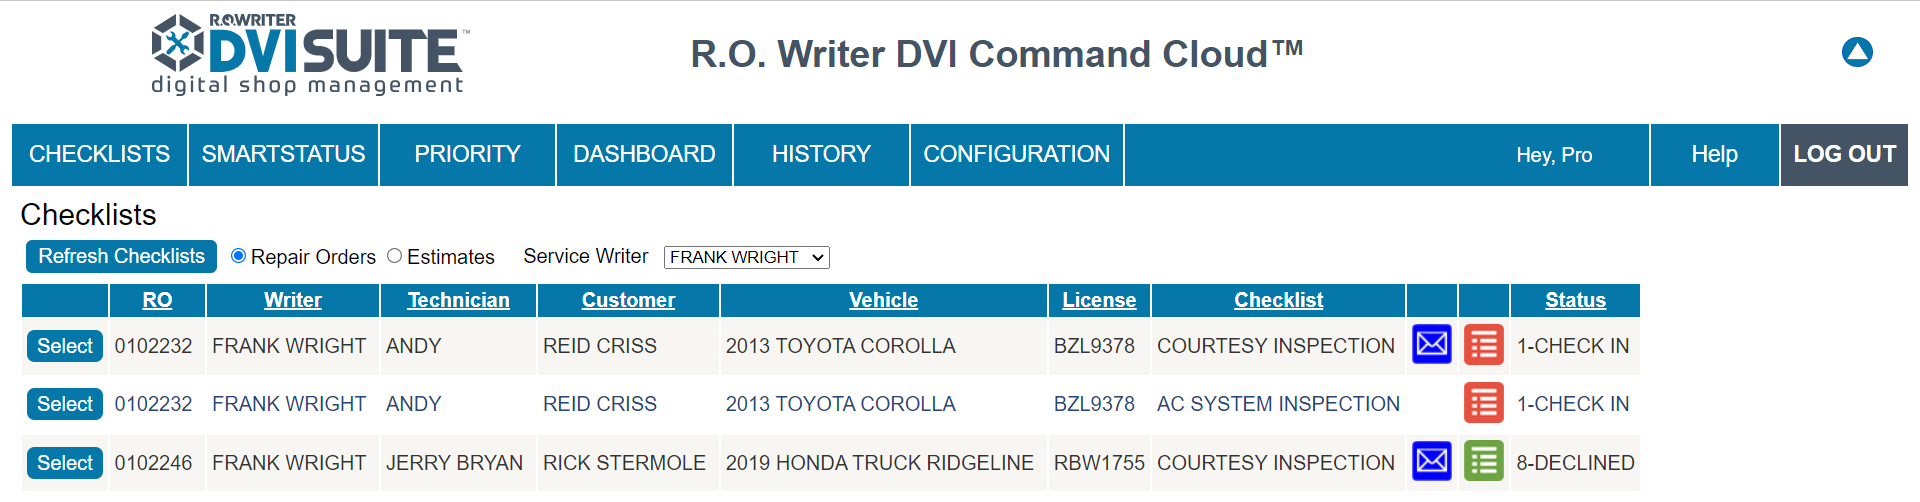
Changes to DVI Command
Enhancements were made to the overall look and feel of DVI Command. Some of the screens were also updated.
- The Checklists, SmartStatus, Priority, Dashboard, and History tabs retain all previous functionality, while minor changes were made to the title bars and icons.
- The logged-in username displays in the title bar.
- Help is now a tab rather than a link.
Login Window
You can use DVI Command from anywhere with internet access. The preferred browser for DVI Command is Chrome. Chromium Edge will work as well.
NOTE: Neither Microsoft Internet Explorer nor Edge will work. DVI Suite 6.0 has not yet been approved to for use with Firefox.
You can log into DVI Command at https://dvi.rowriter.com. The look and feel of the login window has a new layout and icons. The functionality of each button remains the same.
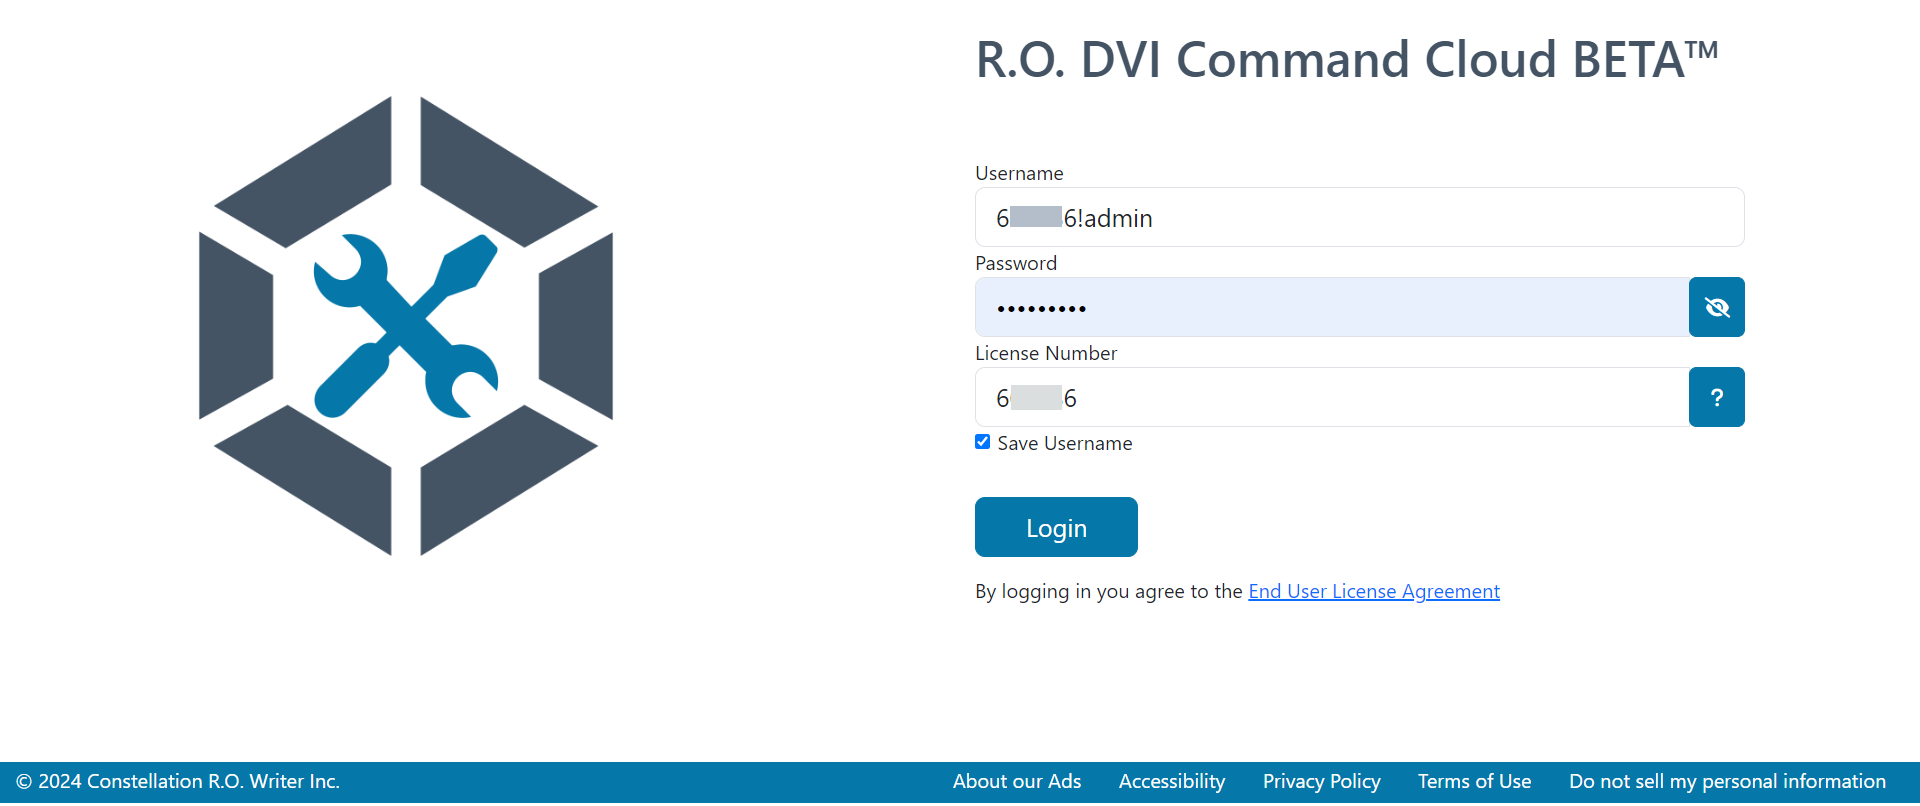
Your DVI users are automatically added to Central Service as a single sign-on (SSO) user. As a result, you have one login that works with both Central Service and DVI Suite 6.0. To log into DVI Command, you need your username, password, and R.O. Writer license number.
- The Password field on the DVI Command login screen now has a show/hide password-eye icon. Click the eye icon to show or hide the password as you enter it.
- To locate your license number, click the question mark (?) button. Your license number appears. This is helpful in case you do not know your R.O. Writer license number.
- You now check Save Username to store the username in the browser.
- The Leave me logged in for the day checkbox is no longer available.
-
When you log in, you see the Checklist tab as the homepage.
General Settings in Configuration
There have been changes to some of the General Settings in Configuration.
Data Locations
The Configuration tab in DVI Command no longer has the Data Locations option because all data location settings are now in the Cloud.
Users
A user must have a Central Service user login before the DVI user can be created. After the Central Service user account is created, the user can be configured as a DVI user. You can manage the DVI user options in DVI Command.
The R.O. Writer database continues to store the Username, Password, and DVI permissions. However, you now perform DVI password changes in Central Service, not in DVI Command > Configuration.
Interfaces & Options
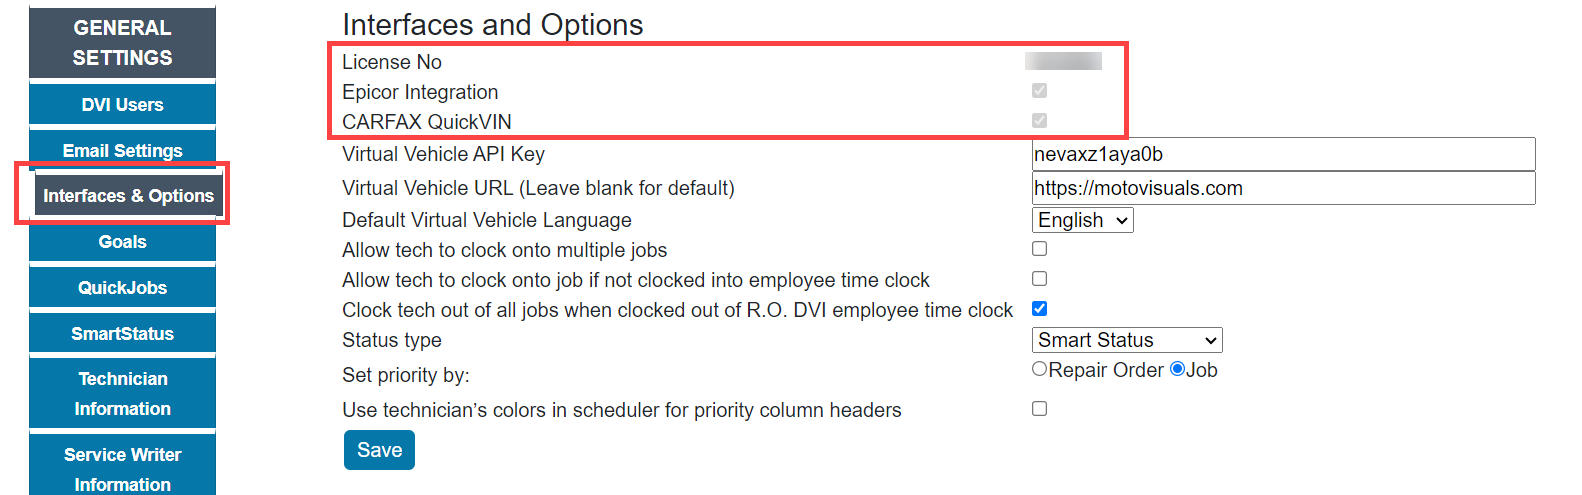
The following settings were enhanced:
- License Number – The number is now displayed on the page (to ensure that you are logged into the correct DVI Suite 6.0).
- Epicor Integration and CARFAX QuickVIN – Both settings are now automatically enabled based on your R.O. Writer licensing. You cannot change these settings in DVI Configuration.
-
Optional Features – The optional features were removed because they no longer apply.
Update
The Update button was removed because it is no longer needed. Going forward, the R.O. Writer Development team will update DVI Suite 6.0 for each release.
Checklists
There have been two changes to checklists: the version and the amount of time the emailed or texted version of the checklist is available to customers.
-
The Checklist Version 1 settings were removed from the Configuration tab because Version 1 is no longer available in DVI Suite 6.0. Only the Checklist Version 2 settings appear because it is the only checklist version available.
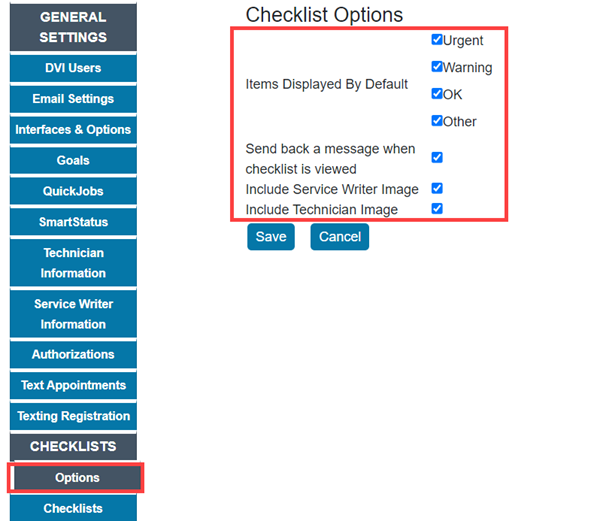
- In DVI Suite 6.0, the checklist link you text and email to customers is now accessible for 180 days. In previous versions of DVI, the checklist link was accessible for only five days.
New Icons in DVI Command
There are new checklist icons in DVI Command 6.0.
Red Checklist Icon
| Old | New |
|---|---|

|

|
Green Checklist Icon
| Old | New |
|---|---|

|
.png)
|
Image Required Icon in a Checklist
| Old | New |
|---|---|

|

|
Changes to DVI Android & iOS Apps
The R.O. Writer DVI App 6.0 includes some design enhancements for both Android and iOS Apps.
NOTE: The images in this section are from the Android version of the DVI app; similar changes appear in the DVI iOS app.
Menu Links
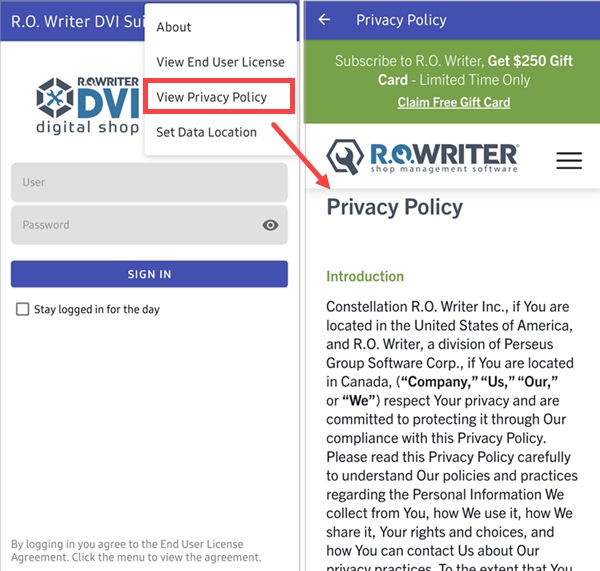
On the login screen, you can now access two menu items that link to the appropriate locations on the R.O. Writer website:
-
The View End User License.
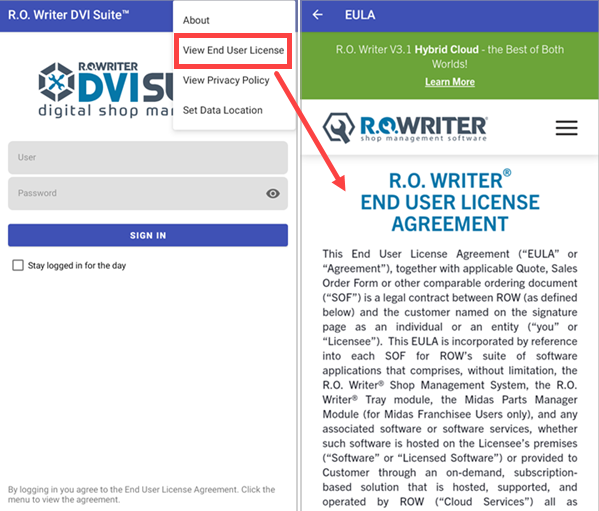
-
The View Privacy Policy.
Set Data Locations
There are also changes to the Data Location setting. To see the new changes, tap the (three dots)
 icon and select Set Data Location.
NOTE: The Cloud Data setting is used only with DVI Suite 6.0.
- Cloud Data – To configure Cloud Data (after you upgrade to DVI Command 6.0), tap the (three dots) icon on the DVI App and select Set Data Location.
Enter your shop’s License Number and tap OK.
-
Dropdown for http:// and https:// (for Android user only) – In previous Android versions of R.O. Writer DVI Suite, you had to type in “http://” or “https://” before the IPv4 address of your shop’s network. Now, you can select either one from the dropdown list. This ensures that the format of the IP address is entered correctly. iOS users still must enter the http:// and https:// protocol.
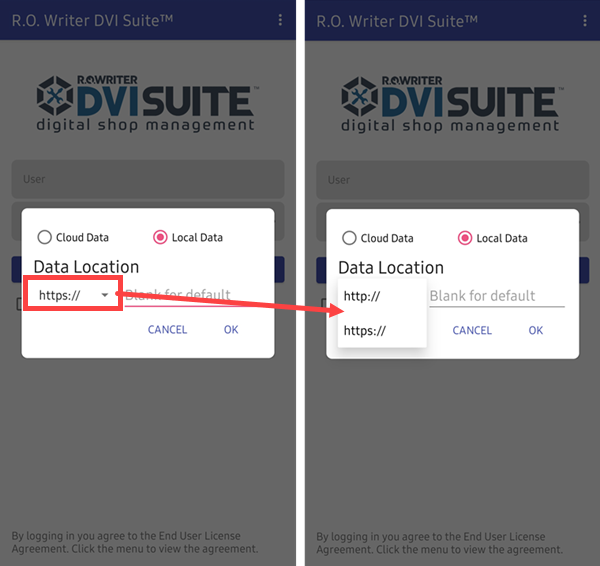
NOTE: An URL is required only for DVI 2.5 users. For DVI Suite 6.0, you will select Set Data Location > Cloud Data in the DVI App. You do not need to enter an URL in the Data Location field.
Login Screen
The Password field on the R.O. Writer DVI App login screen now has a show/hide password-eye icon.
In DVI App 2.5 In DVI App 6.0 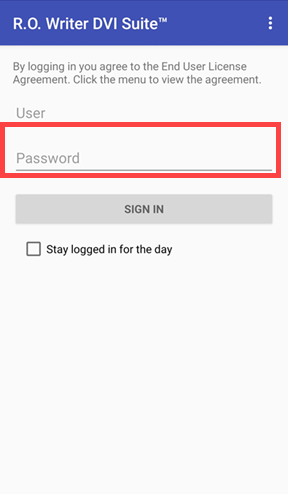
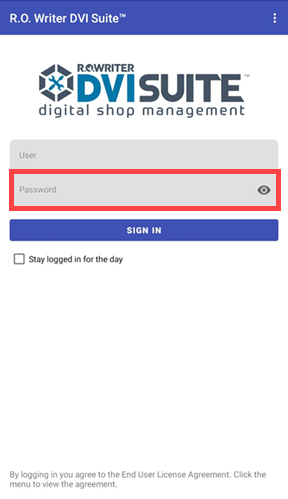
Click the eye icon to show or hide the password as you enter it.
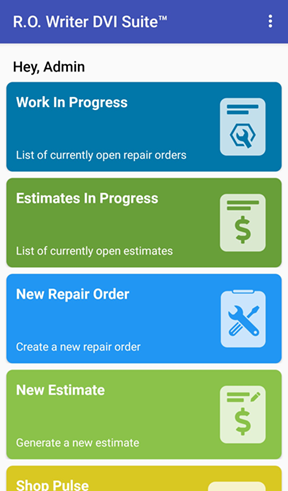
Home Screen
The look and feel of the home screen have been enhanced with a new layout and icons. The functionality of each button remains the same.
In DVI App 2.5 In DVI App 6.0 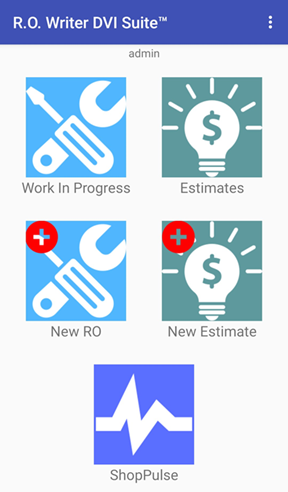
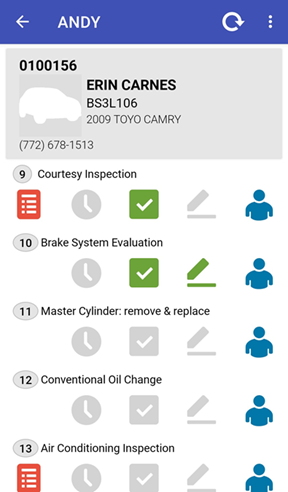
New Icons in Tech View
Some of the icons in the Tech View have changed, however the functionality of each button remains the same.
The following table describes the icon changes in the DVI app: In DVI App 2.5 In DVI App 6.0 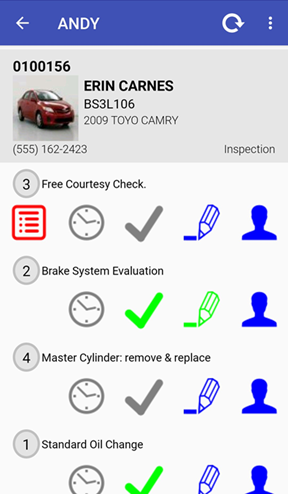
Checklist
In DVI App 2.5 In DVI App 6.0 


Job Timer
In DVI App 2.5 In DVI App 6.0 


Unfinished and Finished
In DVI App 2.5 In DVI App 6.0 


Notes
In DVI App 2.5 In DVI App 6.0 


Technician
In DVI App 2.5 In DVI App 6.0 

Repair Order (RO) Sequence Number
There are changes in the sequence for ticket numbers.
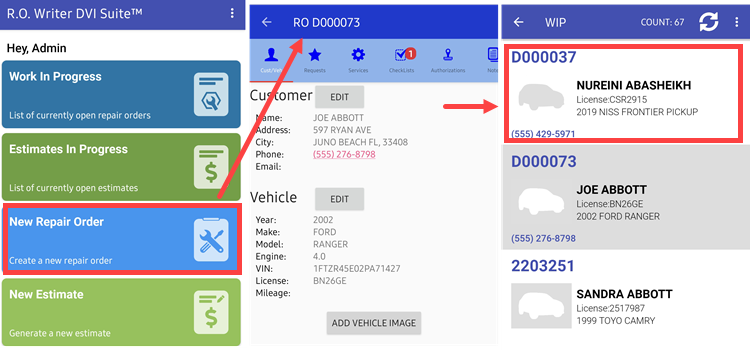
-
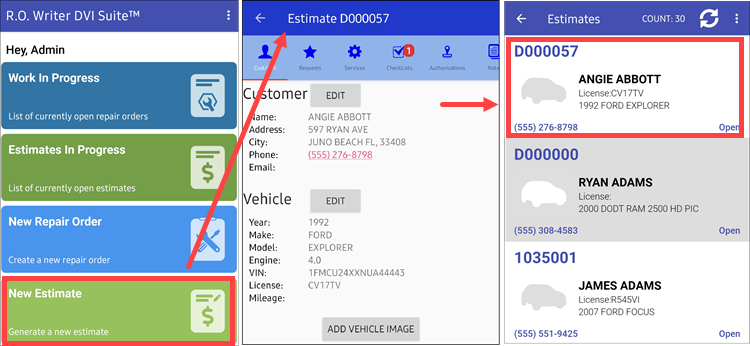
New Ticket Number with letter D prefix - When you create a new repair order in R.O. Writer DVI App 6.0, you now see distinct sequence in ticket numbers, starting with the letter D, e.g., D123456.
-
Similarly, when you create a new estimate in R.O. Writer DVI App 6.0, you see distinct sequence in ticket numbers, starting with the letter D.
-
-
Change sequence numbers – You can finalize the ticket numbers with the D prefix and create invoices with two different numbers, 2203251 and D123456. However, R.O. Writer includes a conversion wizard for ticket conversions. Use the wizard to convert the new ticket number sequence back to normal. Complete these steps:
- Convert Estimates to Repair Orders. It automatically applies the next available repair order sequence number to the ticket, without the D prefix.
- Convert Repair Orders with D prefix to Estimates. Once done, convert the same estimate to a repair order. It puts the ticket number back to the previous sequence format, without the D prefix.
Changes to R.O. Writer
The changes in R.O. Writer DVI Suite caused some changes to R.O. Writer.
User Interface
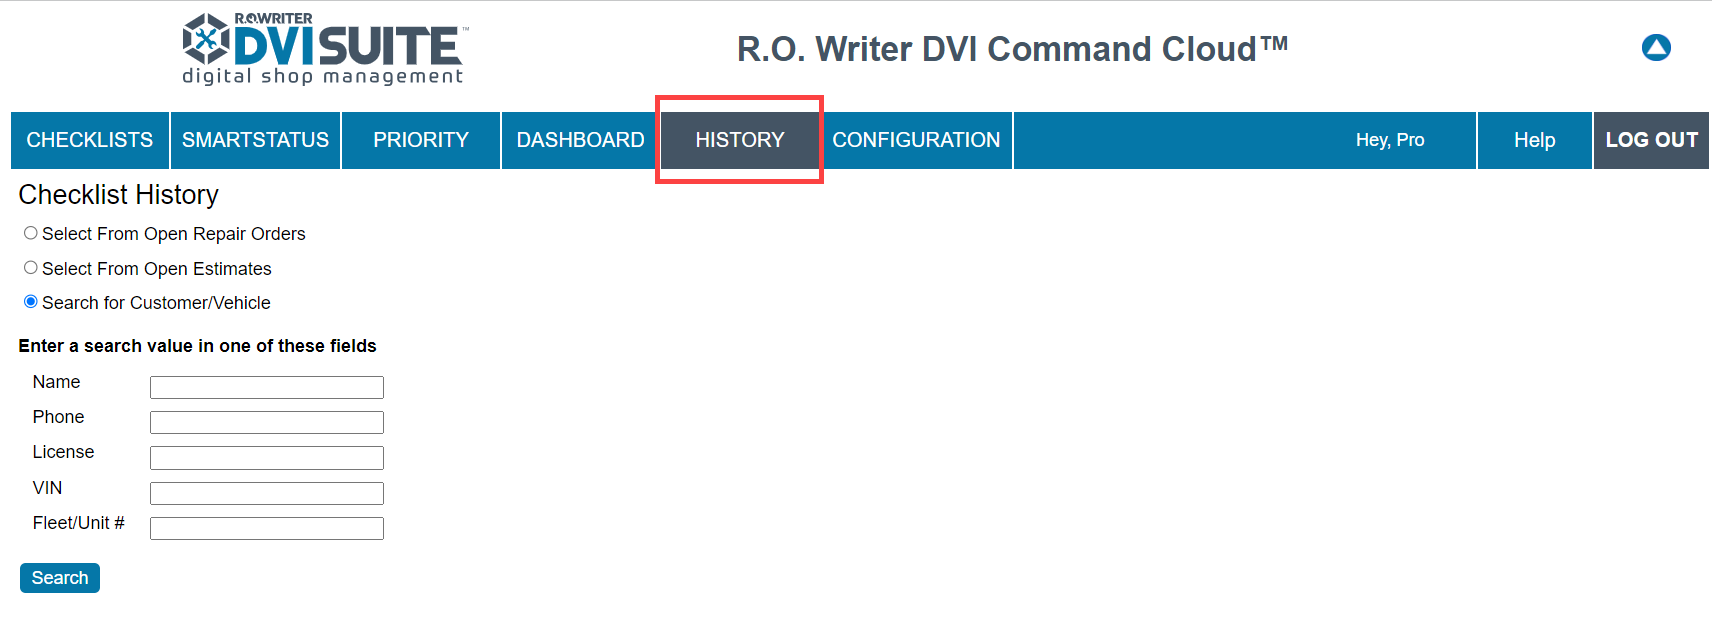
DVI checklists are no longer accessible from the R.O. Writer Reference tab of a repair order. To view historical checklists, use the History tab in DVI Command.
- Cloud Data – To configure Cloud Data (after you upgrade to DVI Command 6.0), tap the (three dots)